

What is Git?
Git is a distributed version control system created to track changes to source code while writing software. Linus Torvalds launched the project in 2005 to utilize the benefits of distributed versions on a nonlinear basis that offered speed and the ability to maintain data integrity . Since it had a distributed model, engineers could work offline with it and merge changes from multiple collaborators easily.
A distributed version control system available for free and open source is called Git. What does version control mean? It's basically a mechanism that lets you save modifications to files so you can access different versions of those files at a later time. Git is a distributed version control system (DVCS) used in software development that keeps track of source code changes. Because Git saves the complete history of changes locally, it allows developers to work offline and interact with distant teams more easily than centralized version control systems can
Software engineers now consider Git to be an essential tool for effective communication, code management, and version control. It is crucial for developers who want to improve productivity and optimize their workflows to comprehend the fundamental ideas and features of Git. To help you understand this robust version control system, we'll go deep into Git's essential elements, processes, best practices, and useful examples in this article.
With the help of Git, developers can efficiently manage code, work together without any difficulties, and produce software projects that are of the highest caliber. Developers may optimize their development processes, reduce mistakes, and boost team productivity by learning Git's essential ideas, workflows, and best practices. Take advantage of Git's ability to spur creativity and project success by embracing it as a core component of your software development toolbox.
Confusing Git Commands:-
Git Merge:-
The command "git merge" is used to combine changes from one branch into another. Git produces a new commit on the target branch when two branches are merged, combining the changes from both branches. To demonstrate how git merge functions, consider the following example:-
- Create a new branch:-
git checkout -b feature
This command creates a new branch named "feature" and switches to it.
Make changes:- Make some changes to the files in your project on the branch "feature".
Commit changes:-
git add .
git commit -m "new feature implemented"
Commit the changes made on the branch "feature".
- Switch back to the main branch:-
git checkout main
Switch back to the main branch.
- Merge the feature branch into main:
git merge feature
This command merges the changes from branch"feature" into the main branch.
Resolve conflicts (if any):- If there are conflicting changes between the two branches, Git will prompt you to resolve them. You'll need to manually resolve the conflicts by editing the affected files.
Commit the merge:- After resolving conflicts (if any), commit the merge:
git commit
- Push changes (if needed):- If you're working with a remote repository, you might need to push the changes to the remote:
git push origin main
After these steps, the changes from the branch "feature" will be integrated into the main branch, and you'll have a new commit on the main branch reflecting the merge.
Git Rebase:-
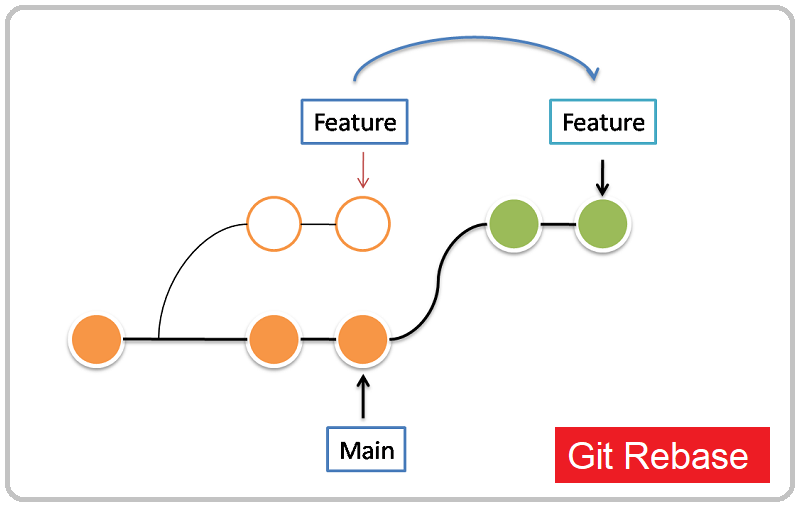
git rebase is a powerful Git command used to change the base of a branch. It is commonly used to incorporate changes from one branch into another or to clean up commit history before merging changes into a main branch. Unlike merging, which creates a new commit with two parent commits, rebasing rewrites commit history by moving or combining commits onto a different base commit.
Let's see an example to illustrate how git rebase works:-
Suppose you have a feature branch called feature based off the main branch, and you want to rebase your changes onto the latest state of the main branch.
Check out the Branch which you Want to Rebase: First, ensure you are on the branch that you want to rebase. In this case, it's the
feature:git checkout featureFetch Latest Changes from the Main Branch: Before rebasing, it's a good practice to ensure you have the latest changes from the remote
mainbranch:git fetch origin mainRebase onto the Main Branch: Once you have the latest changes, you can rebase your branch
featureonto themainbranch:git rebase mainThis command will take all the commits you made on branch
featuresince it diverged frommain, and replay them on top of the current state of themainbranch. If there are any conflicts, Git will pause the rebase process and prompt you to resolve them.Resolve Conflicts (if any): If there are conflicts during the rebase process, Git will stop and ask you to resolve them. You can resolve conflicts in your code manually, add the resolved files to the staging area using
git add, and then continue the rebase process by running:git rebase --continueAlternatively, you can abort the rebase at any time by running:
git rebase --abortPush the Rebased Changes: Once the rebase is complete, you may need to force-push your changes to the remote repository, especially if you've rewritten history. Use caution when force-pushing, as it can disrupt other collaborators who may have pulled the old version of the branch:
git push origin feature_branch --forceCheck the Commit History: After the rebase, you can review the commit history to ensure that the changes have been successfully applied and that the branch now integrates cleanly with the
mainbranch:git log
By rebasing your feature branch onto the latest state of the main branch, you can keep a cleaner and more linear history, making it easier to review and understand changes over time.
Git Reset:-
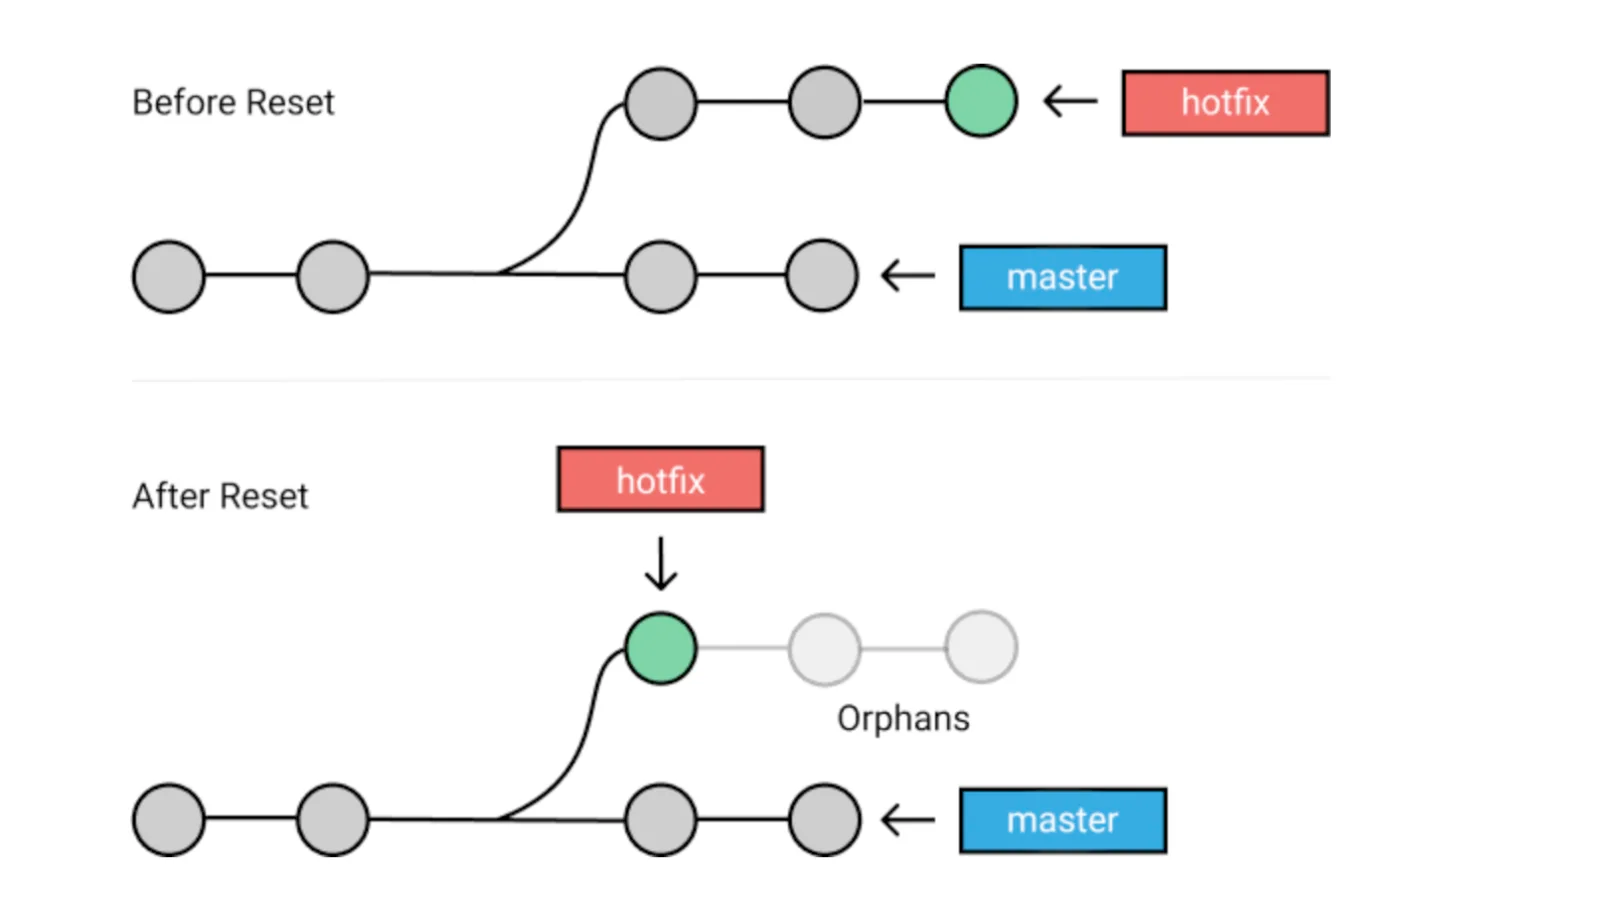
git reset is a powerful command in Git that allows you to move the HEAD pointer to a different commit, effectively altering the history of your repository. It can be used to undo changes, unstage files, or even completely remove commits from the branch's history. Here's how you can use git reset with examples:
- Soft Reset:- A soft reset moves the HEAD pointer to a different commit but leaves your working directory and index unchanged. It effectively "undoes" commits while keeping your changes staged.
git reset --soft HEAD~1
This command will move the HEAD pointer one commit back (HEAD~1), effectively undoing the last commit but keeping the changes staged. You can replace 1 with any number to go back multiple commits.
- Mixed Reset:- A mixed reset is the default behavior if no flag is specified. It moves the HEAD pointer to a different commit and unstages changes, but it leaves your working directory untouched, preserving your changes.
git reset HEAD~1
Similar to the soft reset, this command moves the HEAD pointer one commit back and unstages the changes. Your modifications will remain in your working directory.
- Hard Reset:- A hard reset moves the HEAD pointer to a different commit and discards all changes in the working directory and index, effectively reverting to the state of the specified commit.
git reset --hard HEAD~1
This command moves the HEAD pointer one commit back and discards all changes, reverting your working directory and index to the state of the specified commit. Use with caution, as it permanently removes changes.
- Resetting Specific Files:- You can also use
git resetto unstage specific files while keeping others staged or committed.
git reset HEAD <file>
This command unstages the specified file, removing it from the index but leaving your working directory unchanged. Replace <file> with the name of the file you want to unstage.
- Resetting to a Specific Commit:- You can reset to a specific commit by specifying its hash.
git reset --hard <commit-hash>
This command will reset your working directory and index to the state of the specified commit. Replace <commit-hash> with the hash of the commit you want to reset to.
Git Revert:-

git revert is used to undo changes made to a repository by creating a new commit that represents the inverse of the undesired commit. This is different from git reset, which directly modifies the commit history. git revert maintains a clear history by creating a new commit that undoes the changes from a previous commit.
Use git revert with an example:
Identify the Commit to Revert:- First, you need to identify the commit that you want to revert. You can do this by using
git logto view the commit history:git logLook for the commit you want to revert and note its commit hash.
Revert the Commit:- Once you've identified the commit, you can use
git revertto create a new commit that undoes the changes introduced by that commit. You can revert a specific commit by providing its hash:git revert <commit-hash>For example:
git revert abc123This command will create a new commit that undoes the changes introduced by the commit with the hash
abc123.Resolve any Conflicts (if necessary): If there are conflicts between the changes you're reverting and other changes in your repository, Git will pause the revert process and prompt you to resolve these conflicts manually. You'll need to resolve these conflicts in the affected files and then continue with the revert process by staging the changes and committing them.
Commit the Revert: Once you've resolved any conflicts, you can continue the revert process by committing the changes:
git commitThis command will open your default text editor for you to write a commit message. By default, Git will provide a commit message indicating that it's reverting the changes introduced by the specified commit. You can modify this message as needed and save the commit.
Push the Revert to the Remote Repository: Finally, after committing the revert locally, you can push the changes to the remote repository:
git pushThis command will push the new revert commit to the remote repository, effectively undoing the changes introduced by the original commit.
By using git revert, you can safely undo changes in a Git repository without altering the commit history, ensuring a clear and maintainable project history.
Git Fetch:-
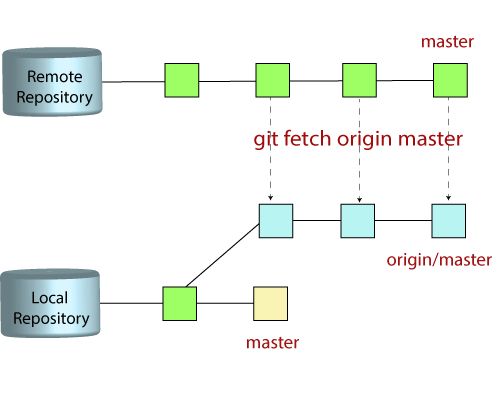
git fetch is a Git command used to retrieve changes from a remote repository without merging them into your local branches. It's useful for keeping your local repository up to date with the changes made by others in the remote repository. Here's how git fetch works with an example:
Let's say you're working on a project with a remote repository hosted on GitHub. Other team members have been pushing changes to this repository, and you want to update your local copy to include those changes.
Check Remote Branches:- Before fetching, it's a good idea to see what branches are available in the remote repository. You can do this by running:
git branch -rThis will show you a list of remote branches.
Fetch Changes:- To fetch the latest changes from the remote repository, simply run:
git fetchThis command will fetch all branches from the remote repository and update your local repository's remote-tracking branches (e.g.,
origin/master,origin/develop, etc.) to reflect any changes made on the remote.Check Remote Branches Again:- After fetching, you can run
git branch -ragain to see if any new branches have been added or if existing branches have been updated.View Changes:- Even though
git fetchretrieves the changes, it does not automatically merge them into your local branches. To see the changes fetched from the remote, you can use commands likegit logorgit diffto compare the remote branches with your local branches.Merge Changes (Optional):- If you want to incorporate the fetched changes into your local branches, you can do so using the
git mergecommand. For example, if you fetched changes to theorigin/masterbranch and want to merge them into your localmasterbranch, you can run:git checkout master git merge origin/masterThis will merge the changes from the remote
masterbranch into your localmasterbranch.
By using git fetch, you can keep your local repository up to date with the changes made by others in the remote repository without immediately integrating those changes into your working branches. This allows you to review the changes before deciding how to incorporate them into your own work.
Git Pull:-
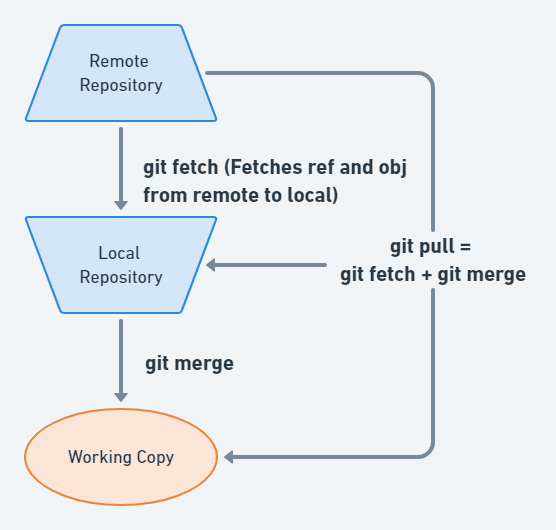
git pull is a Git command used to fetch and integrate changes from a remote repository into your local branch. It's essentially a combination of two commands: git fetch and git merge. Here's how git pull works with an example:
Check Remote Changes: First, let's assume you're working on a project that is hosted on a remote Git repository like GitHub or GitLab. Before pulling changes, it's a good idea to see if there are any new changes on the remote that you don't have locally. You can do this by running:
git fetchThis command retrieves the latest changes from the remote repository but does not merge them into your current branch.
Pull Changes: Once you've fetched the latest changes, you can integrate them into your local branch using
git pull. This is typically done with the following command:git pull origin <branch-name>Here,
originrefers to the remote repository (it's the default name for the remote repository from which the clone was made), and<branch-name>is the name of the branch you want to pull changes from.For example, if you want to pull changes from the
mainbranch of theoriginremote repository, you would run:git pull origin mainThis command fetches the latest changes from the
mainbranch of theoriginremote repository and merges them into your current local branch.Resolve any Merge Conflicts (if applicable): If Git detects any conflicts between the changes you're pulling and the changes you've made locally, it will pause the pull process and prompt you to resolve these conflicts manually. You'll need to edit the conflicted files to resolve the conflicts and then stage the changes to continue the merge process.
Commit the Merge (if applicable): Once any conflicts are resolved, Git will automatically complete the merge and stage the changes. You'll then need to commit the merge to finalize the process:
git commit -m "Merge remote-tracking branch 'origin/<branch-name>'"Replace
<branch-name>with the name of the branch you pulled changes from.
By following these steps, you can keep your local branch up to date with the latest changes from the remote repository, allowing for better collaboration and code synchronization in a team environment.
Git Cherry-Pick:-
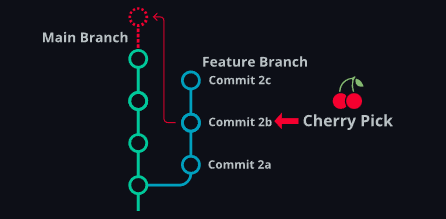
git cherry-pick is a command used to apply a specific commit from one branch to another. This is useful when you want to bring in a single commit from another branch without merging the entire branch. Here's how git cherry-pick works with an example:
Let's say you have two branches in your repository: branch-A and branch-B. You want to apply a commit from branch-A onto branch-B without merging the entire branch-A into branch-B.
Identify the Commit to Cherry-Pick: First, you need to identify the commit you want to cherry-pick. You can find the commit hash by using
git log:git logNote down the commit hash of the commit you want to cherry-pick.
Switch to the Target Branch: Switch to the branch where you want to apply the cherry-picked commit. In this case, it's
branch-B:git checkout branch-BCherry-Pick the Commit: Now, you can cherry-pick the commit by using its commit hash:
git cherry-pick <commit-hash>Replace
<commit-hash>with the actual hash of the commit you want to cherry-pick.Resolve Conflicts (if any): Git may prompt you to resolve any conflicts that arise during the cherry-pick process. If there are conflicts, resolve them manually, add the resolved files, and then continue the cherry-pick process by running:
git cherry-pick --continueVerify the Changes: After cherry-picking, verify that the changes from the cherry-picked commit have been applied to
branch-Bas expected by examining the code, running tests, etc.Commit the Changes (if needed): If everything looks good, you may want to commit the changes introduced by the cherry-pick:
git commit -m "Cherry-picked commit <commit-hash> from branch-A"Replace
<commit-hash>with the actual hash of the cherry-picked commit.
That's it! You've successfully cherry-picked a commit from one branch to another. This allows you to selectively apply changes from one branch to another without merging entire branches, providing more granularity and control over your version control workflow.